Canon C100 Hands On Review
I was lucky to have a couple of shoots lined up around the same time the s35 sensor Canon C100 was available for rental. I decided to give the Canon C100 a try after hearing and seeing so many positive reviews of the camera. I own an AF-100 and use it as my primary camera. The F3 is one of my favorite cameras for TVC work, but the ergonomics aren’t so good.
I don’t have many EOS EF lenses. My collection is 24-105 f4 IS, 70-200 f4 non IS,, and the plastic fantastic 50mm. That’s it! I sold off the 17-40 early in the year. Darn it! I have a Fotodiox Nikon to EOS adapter, so I was able to use the Zeiss 85mm ZF on the Canon C100 and it works great. The only issue is the Nikon’s focus in the opposite direct. That messes with me if I’m using both types on the same shoot.
I was going to rent the 24-70 f2.8 but knew the shooting style would be handheld walking shots that I needed the IS, so I passed.
I decided to use the camera in the out-of-the-box configuration. Keep it simple. I have to say it works very well with no rig. Handheld is a breeze. The camera feels like a big DSLR with a pistol grip.
Ergonomics and ease of use.
This is a big one, so I’m going to start here. Shooting all-day handheld is hard enough. With the way the C100 is laid out, it’s the most ergonomic camera I have used so far, straight out of the box with no add-ons.
Here is why:
The grip is solid. I had a firm grasp on the camera. Just feels secure for handheld. It’s also adjustable if you want to swivel it a bit but the stock position was fine for me. The camera weighs a little more than the AF-100.
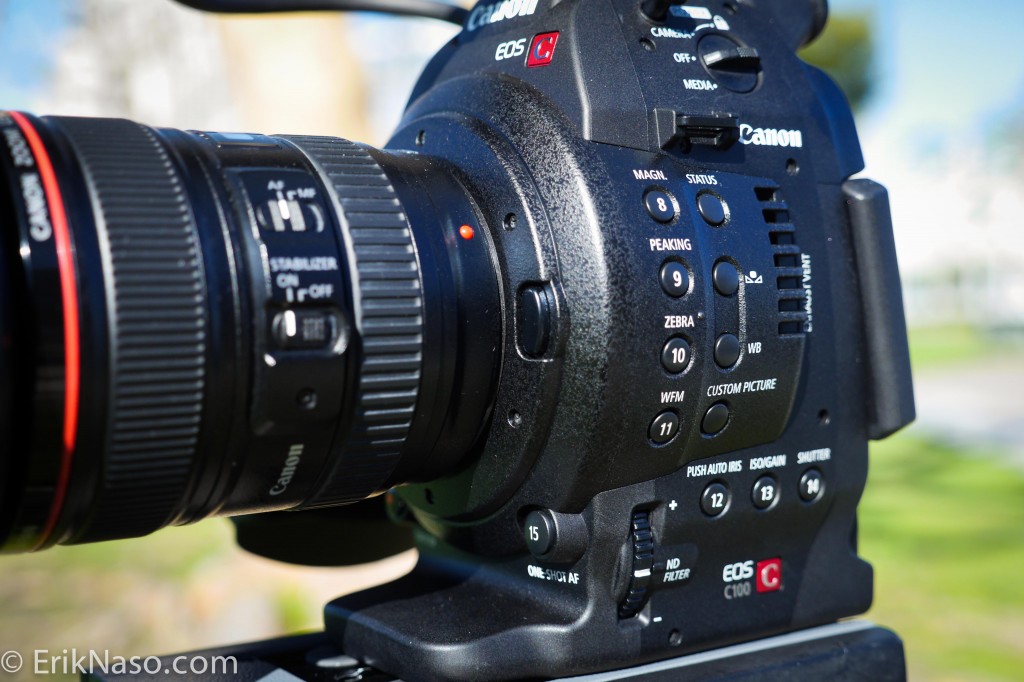
All the buttons are on one side of the camera. Getting used to the layout was easy. No searching around for a function button all around the camera made getting familiar with C100 a breeze.
On the C100’s pistol grip there are several logical buttons such as an f-stop dial, magnification, and a mini joystick menu navigator all right at your fingertips. Oh, and a record button perfectly under your index finger.
Magnification works so darn well. Its 2X zoom in makes getting focus so much easier and it even works while you’re recording!
One missing feature that’s a miss is when the LCD is flipped open the magnification in the viewfinder doesn’t work. That’s strange. It’s one feature I wish my AF-100 had, but not being able to use magnification in the viewfinder simultaneously with the LCD screen is silly. Not sure if the C300 does this as well.
The C100 viewfinder and LCD are smaller than the C300 and have no eyecup on the EVF. The viewfinder/EVF is my least favorite design on the C100 because it has no eyecup. It’s a hard piece of rubber that doesn’t cover your eye. When I was shooting outside I got so much light leak that I couldn’t see anything so I had to rely on the LCD with no hood. Scary!! It worked out since the peaking feature with magnification made focusing easy. Always nice to have a waveform monitor available and the C100 does. When handheld having the camera up against your face helps to stabilize it and also gives your shoulders some help. The built-in diopter adjustment is hard to get to. It’s tight underneath the viewfinder and while adjusting it when you’re looking into the viewfinder is awkward. It looks like I’m picking my nose while making the adjustments. Not pretty. It’s also very touchy when dialing it in.
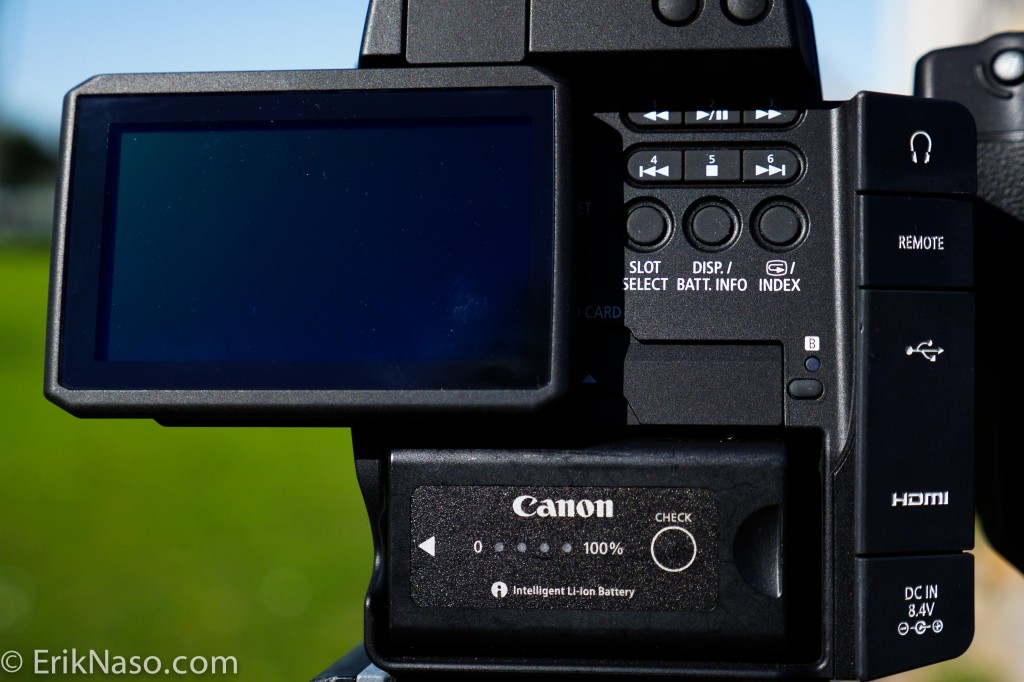
The LCD screen is nice, but the placement on the back is limiting. I had the camera on a tripod at eye level to the talent which makes it hard to see the LCD. No way to flip it due to the design. You only have open or closed and open is slightly tilted up. The C300 design would have been a better way to go.
Push to focus is a nice feature that I use with Lumix lenses on the AF-100. It works well and gets you in there fast. I was using the Canon 24-105 f4 for most of the shoots and had some issues with the push to focus. Not sure why, but with magnification, it’s easy to check and adjust.
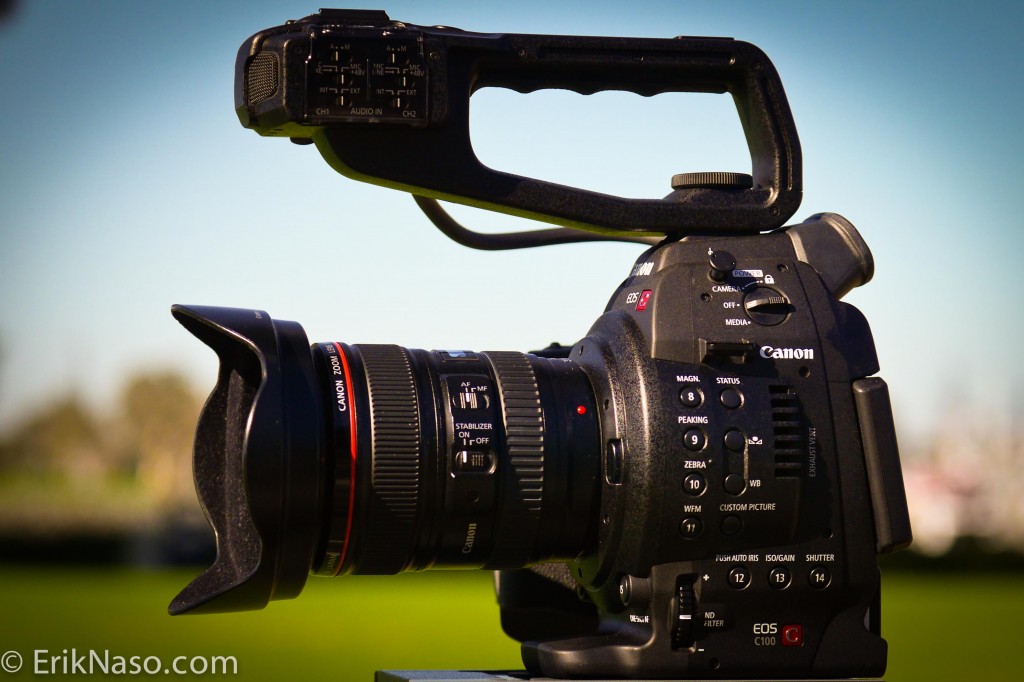
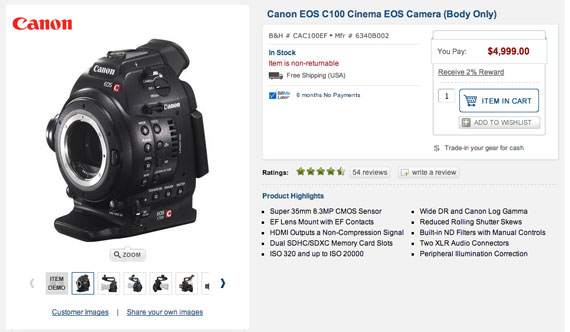
The top handle looks funny on the camera but works great for balance when carrying. XLR inputs and record levels are also on the handle. I didn’t have any issues with them at all. I slapped a Sennheiser wireless on the cold shoe and was set. The XLR inputs right underneath the receiver made it nice and tidy. The C100 also has a mic mini plug input. Great for a Rode VideoMic Pro VMP Shotgun Microphone.
This Rode is a really nice mic. I used it on a GH3 for capturing musicians playing and it amazed me how clear it was recording directly into the GH3 mic input. The handle also has a cable that passes the signal to the camera. This cable is built into the handle so if it breaks you will have to send it to Canon for repair. It does feel very solid so hopefully, it will last a good long trouble-free life.
If you don’t want to shoot with the handle attached then you lose the XLR inputs as well as the built-in stereo mic, but still, have a cold shoe on top of the camera for the Rode, and since the mini-plug input is on the body sound can still be recorded. This is the super stripped-down DSLR look.
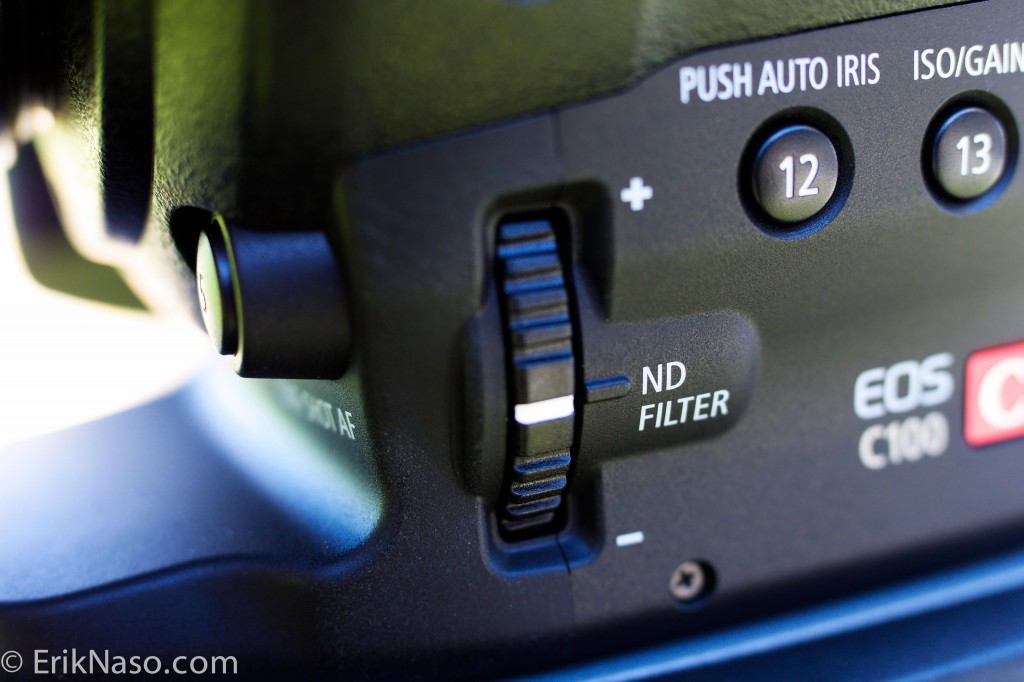
Built In Audio CableThe ND filters are selected with a dial. It’s firm as it locks into each filter. A dial is rotated to give you up to 6 stops in 2 stop increments. No camera should be designed without built-in ND filters from here on out! So important to have and when you don’t your fumbling with filters and/or a matte box.
The push to focus button is located under the lens in the right place close to the ND and lens.
The C100 has an HDMI out outputting an 8-bit uncompressed signal, but no SDI. A camera at this level should have SDI. Oh Canon, I know you’re protecting the C300. This makes us crazy!!! If you add an Atomos Ninja 2 to the C100 you will get a very high-quality ProRes 4:2:2 codec that is better than the C300’s internal Canon MXF. This isn’t surprising since the ProRes codec is less compressed and requires more storage space. I’m not a big fan of external recorders but if you need the extra color space for your project this is a great way to go. The Atomos Ninja 2 also gets triggered and adds the same timecode by the C100 so it’s a really nice companion.
In order to keep the camera from overheating a fan and exhaust are located in the back of the camera. I set the fan to automatic from on. It does make a little noise, but I wanted to play it safe. The fan never kicked in while I was shooting.
If you have EF-S lenses there is a setting for that. No Canon lens will be left behind. Check out this post on What Lenses Should I Buy.
The battery is very good. Two lasted all day and I shot a full 16gig card, so about 80 min. Recording and a ton of reviewing clips to check for good takes.
The camera records to SD cards and has two slots. A nice feature is simultaneously recording to both cards for mission-critical projects that need a backup, cool. I finally found a reason to say mission-critical.
Playback is easy with just a turn of the main power switch to MEDIA. All the playback buttons are in the back of the camera next to the LCD screen. This worked great.
I was surprised that the C100 doesn’t have the ability to over-crank or slow-mo. The C300 does but only in 720. That’s to bad since so many cameras offer this and even the GH3 has a 48% setting and the slow-mo looks really good. Is this a deal-breaker? Probably not for most people but I do like to over-crank on occasion.
Overall I enjoyed the C100 on my two days of shooting with it. The viewfinder is an issue but I think it can be fixed with an eyecup by a third-party company. IS works so well with EOS lenses and if you already have them your set to use this camera and get the full benefits of working with native EOS glass.
The Image.
Right off the bat, I can tell you the image is fantastic! Sharp and natural-looking. I shot in Canon Log mode at ISO 850 to get the most DR from the camera. When in log mode the LCD image gets darker. I used the View Assist feature setting in the menu to brighten up the LCD display. This helped. I brought some clips into Premiere Pro CS6. Did a quick grade and was impressed. I like to grade my footage and with the 12 stops of DR in Canon Log mode, you get a nice flat image ripe for post-processing. The camera shoots in AVCHD MPEG-4 AVC/H.264 at 24Mbps 4:2:0. AVCHD keeps getting better and more efficient. If you need to really push your images in post that could be a problem. This is an 8bit camera, however, and I was getting more from the shots than I have in the past when not shooting in log.
I was impressed with how the grain or noise looks. It is one of the most organic-looking cameras I’ve used. The noise isn’t ridden with red, green, and blue spots, but more neutral. Dare I say, almost film-like. Even at 850, it’s pretty clean and at 20,000 ISO it’s really quite amazing. This is a low-light camera.
Next up….
I wanted to get this hands-on overview up on my blog now. The spots that I used the C100 on are being edited, so I can’t show the footage yet until the spots are on the air. I really want to show you how the footage looks, and I promise I will post the spots here as soon as they are ready.
I will be talking about the C100’s AVCHD codec and how it holds up in post. The two spots that I shot with the C100 are very different. One was all handheld walking and talking similar to the others I shot, but in the second spot I used a slider and shallow depth of field where the focus can be challenging. Love the 2x magnification!
I hope this hands-on review helps you get a better feel for the C100. I have only a couple of sticklers. The lack of over-cranking and the viewfinder challenges. I can live with no SDI since the HDMI outputs uncompressed 8bit 4:2:2. Hook up an Atomos Ninja 2 and you are good to go if you need a stronger codec.
It’s a very nice camera with the best ergonomics I have seen so far. Being able to use Canon lenses natively is huge, add to that the new Canon cinema lens and your choices are endless.
Happy shooting!
If you’re thinking bout getting a Cinema EOS camera or buying other gear please use the links on my site. It cost you nothing extra but helps offset the expense of running this website. Thanks!
I made an error in the viewfinder and LCD specs in the video. The C100 and C300 have different versions. Below are the specs for both.
C100 Specs:
Viewfinder
0.24-inch (0.61 cm diagonal) color wide-screen LCD with 16:9 aspect ratio
Equivalent to approx. 1.555 million dots (960 x RGB x 540), 100% field of view ratio
LCD Screen (Monitor Unit)
3.5-inch (8.8 cm diagonal) color wide-screen LCD with 16:9 aspect ratio
Equivalent to approx. 922,000 dots (640 x RGB x 480), 100% field of view ratio
C300 Specs:
Viewfinder
0.52-inch diagonal, color 16:9 rotatable LCD
+2.0 to -5.5 diopter eye adjustment
LCD Screen (Monitor Unit)
4-inch diagonal, 1.23 megapixel color 16:9 rotatable LCD
100% field of view
adj. brightness, contrast, color, sharpness and backlight
Grading The Image.
A pretty good storm hit San Diego on Thursday so we decided to do a proof of performance spot of our storm coverage. These are our weather anchors.
Lucky for me I can know show a graded image since It’s already aired. The team shot will also be used in another edit coming next week.
Click on the image to see them bigger and with more detail.
Here is the ungraded shot. Its from a TIF frame export from Premiere Pro CS6. Flickr crunched it to a .jpg 🙁

Ungraded frame from Premiere Pro
Graded with Magic Bullet Colorista II
I’m liking the control I can get with Canon log. This was a tough shot to get because the talent is in the shade and the background is in full noon day sun. I didn’t have a scrim big enough to cover all four so this shot was really my only option. I used one 4×4 bounce board to fill but up high I needed more. You do the best you can. The DR in log mode on the C100 is impressive.
Normally I wouldn’t have been able to get this without loosing the background. As I graded the the spots I noticed how much detail is present in the image. The bushes on the lower left show very nice edge detail on the leaves as well as the purple jacket folds are so sharp. This was shot with the Canon 24-105 f4 L. Great and practically perfect for the C100 & C300. for the C100 & C300.
Here are three image promos shot with the Canon C100 with log. Color graded with Magic Bullet Colorista II.
C-Log with AVCHD?
I’m not a colorist. I’m a DP/Editor that enjoys grading images. My main tool for grading is magic Bullet Colorista II. I have been using it now for a couple of years. It’s so easy to use and I get good results. The main reason I use Colorista II is because I dont have to leave the NLE to use it. It’s a plugin. I Plop it on a clip and then change my window setting to Color Correct and I’m grading. In Premiere Pro it flies. Final Cut 7 is slower and renders are longer. Premiere Pro CS6 has been a great upgrade for me.
I finished grading the spots today and added the graphics. I must say, overall I’m impressed with Canons implementation of the AVCHD codec. It holds up well under normal grading. Not bad for an 8bit 4:2:0 25Mbs codec. I did run into a few problems, but they where caused by me. I underexposed a few scenes and really had to push the shot more than I wanted in post. The Canon C100 handles highlights better than my AF-100, so I backed off the shot to avoid clipping and ended up with about a 1.5 stop under capture. In log I had more latitude, but didn’t use it, lesson learned. I’m really impressed by the roll off of the highlights. I had a few go above 100IRE and no ugly yellow clipping to be found. I like a camera I can push! When I went to fix the under-exposed shots I had to use a secondary mask on the talent’s face to get it to pop. The scenes on the bay were tough. The background was very hot from the fog and the sun was bright overhead. I had a Mathews bounce board for a fill and that was it. The scrim was useless for all these shots. I needed more, but the pace of the production was fast, and no time to get too fancy with HMI’s and generators. I figured if I can underexpose the shot I could bring it up in post. I didn’t want to blow out the skyline. That’s why we shot at the bay. If I had known that the highlights could take a beating I would have to open up the iris more. This did introduce some noise since the image information was lower. A little Denoiser fixed it pretty well.
Another tough shot was in the alley. Where else are you going to shoot an investigative reporter! I used the Canon 70-200 f4 at 200 wide open. Here’s where I could have used the extra two stops from the f2.8 version. The reflector did so little because the light wasn’t getting into the small space. I should have upped the ISO from 850. The camera shoots pretty clean at high ISO and it would’ve been a breeze to clean up. Lesson learned take two. I first did an overall grade then added a secondary mask around her face and chest to brighten her up a little. This worked well, I did push it to the breaking point so this was the best I could get it without breaking the codec. Again added Denoiser to clean it up. Magic Bullet Denoiser is solid. It takes some power to run it, so I add it at the end of the edit. Well kind of, I’ll add the plugin and test it to see if it cleans up and if it looks good I disable it and continue to grade the image, then after I get the look I turn it back on and rendered the clip.
The tail shot was one I didn’t think we could get to look good. The talent is in full shade and the building is in full sun. When the director and producer wanted to shoot on the stairs I said we can try it but I’m not sure. After seeing the shot in the DP6 I knew I could work with it. This shot impressed me and shows what log is really good at. In post I did an overall grade then added two masks. The first one is on the two anchors on the right to bring them in balance. They were a little darker up top since the reflector wasn’t strong enough to reach them as much. I need two of these large bounce boards. The second mask is on the left upper corner of the building. I created a rectangle mask and brought the exposure down. Added keyframes to match the pan on both masks. That’s it!
There is so much to like about this camera and the image that it creates. I had fun shooting and grading the footage from the Canon C100. It’s never easy to pickup a camera you’ve never used before and do a real project with it, but hey why not just go for it! The log image has so much image detail in the shadows it makes you want to keep them. I like crushed blacks and vibrant images. Always have. But I couldn’t get myself to crush it. I like seeing the detail in the C100 image, so I tried to retain it while giving the grade some contrast. Sort of meeting it halfway. Fun stuff!
Finally, it was time to output the spots for broadcast. I shot in 24p and we air in 29.97 that makes conversion a must. This was the first time I had to do this since I usually shoot in 30p with the AF-100 and HPX370. 30p gives a more filmic look at 29.97. My first try was converting with Adobe Media Encoder. I couldn’t find the settings to change the frame rate and was stumped. I used my preset I created for our specs and the clip had massive interlacing. Oh no! I reached out to my fellow editors on Twitter and the best advice was to check the clip in Premiere Pro so I can see how it looks on my broadcast monitor. Great idea! Did just that and it played back perfectly. No issue. When you playback the clip on the computer it looks terrible. I dont have the same playback with native 29.97, but for some reason the converted files look interlaced only on the computer.
Not every shoot would require shooting in C-log and the C100 can render very nice images with the custom settings in camera. If you’re like me and enjoy grading and pushing the image around a little then give C-log a try. I was surprised Canon put a log profile on an AVCHD camera, but they must have known the codec will hold up and it does pretty well. A DP on DVXuser went to a C100, C300 seminar and the instructor said to shoot C-Log at 32 IRE for exteriors, using an 18% gray card and 40 IRE for interiors. I haven’t tried this formula yet, but give it a try. Just use your trained judgment as a DP and get the proper exposure and the grading will be much easier with many more keeper takes.
Signup for my newsletter! Follow me on Twitter – Facebook and my Youtube Channel.
Thanks for coming by! Please help support my site by using the links on this page or bookmark these from my favorite retailers, B&H, Adorama, Zacuto, Amazon.com & Think Tank Photo Using the links cost you nothing extra, but it helps offset the cost of running my blog.
Help Support My Blog By Using This Link For B&H.
Full Specs
Audio
24 Mbps Mode: Linear PCM; 2-Channel; 16-Bit; 48 kHz
All Other Modes: Dolby Digital AC3
Built-in Microphone: L/R
External Audio Inputs: 2 – XLR inputs (Auto and Manual level settings)
External microphone terminal: (3.5 mm diameter)
Recording Channel Selection:
This is used to set the allocation of the audio channels:
CH1/CH2: The CH1 signals are allocated to the L output channel, and the CH2 signals are allocated to the R output channel.
CH1/CH1: The CH1 signals are allocated to the L output channel, and the CH1 signals are allocated to the R output channel.
CH2/CH2: The CH2 signals are allocated to the L output channel, and the CH2 signals are allocated to the R output channel.
ALL CH/ALL CH: Signals obtained by mixing the CH1 and CH2 signals are allocated to the L and R output channels.
XLR Mic Trimming: Available; -12dB, -6 dB, 0dB, +6dB or +12 dB
Recording Level Adjustment Range: – Infinity to +18dB
Phantom Power: Available; +48V
Headphone Adjustment: 16 Settings; Volume is muted at lowest setting
1KHz Tone: Available: Available; -12, -18, or -20 dB
Image Sensor
Sensor Type: CMOS sensor (single-panel) equivalent to Super 35mm
Sensor Size: 24.6 x 13.8 (28.2 mm diagonal); 6.4 ?m cell pitch
Scanning System: Progressive
Number of Sensors: 1
Filter: RGB Primary Color Filter (Bayer Array)
Imaging Processor: DIGIC DV III
Effective Pixels
Approx. 8.29 megapixels (3840 x 2160)
Total Pixels
Approx. 9.84 megapixels (4206 x 2340)
Max. Movie Recording Time
(1) Recording media: SD/SDHC/SDXC card
(2) Number of slots: 2
Note: Movie and photo recording is enabled. Also, custom pictures (20 files) and settings of data such as menus can be recorded.
Recording media operation results: A list of cards that can be used for recording will be provided separately.
Clips of 59.94 Hz and 50.00 Hz modes cannot be stored together on a single media device.
The maximum continuous recording time is 12 hours. When this time has elapsed, recording will stop automatically. When continuous recording is performed, data is divided up in 2 GB files. When 50 files are recorded for 1 clip, recording will stop automatically.
Lens
Interchangeable: EF mount for compatibility EF, EF-S and EOS Cinema lens systems (non-PL).
Focusing System
Manual; One-Shot AF
Autofocus system is available; AF is dependent on interchangeable lenses
Max. Shutter Speed
1/2000 sec.
ISO Range
320 to 20,000 in 1-step and 1/3-step increments
ND Filter Settings
Mechanical ND filter system with option of clear, 2, 4, and 6 stops
White Balance
AWB, Kelvin setting (setting range: 2000K to 15000K), daylight, tungsten, set A, set B
Frame Rate
NTSC: 60i, 30p, 24p
PAL: 50i, 25p
Minimum Illumination
59.94 Hz: 0.3 lux
50 Hz: 0.25 lux
Illumination Correction
Available
Genlock Terminal
N/A
HD/SD-SDI Terminal
N/A
Timecode Terminals
N/A
Viewfinder
0.24-inch (0.61 cm diagonal) color wide-screen LCD with 16:9 aspect ratio
Equivalent to approx. 1.555 million dots (960 x RGB x 540), 100% field of view ratio
LCD Screen (Monitor Unit)
3.5-inch (8.8 cm diagonal) color wide-screen LCD with 16:9 aspect ratio
Equivalent to approx. 922,000 dots (640 x RGB x 480), 100% field of view ratio
Microphone
Stereo (electret condenser microphone)
Recording Media
SD Card x2 (Video, Still Images (JPEG), Custom Picture Data*, Clip
Metadata, and menu settings); SD/SDHC/SDXC Supported; MMC Cards are not supported
*Custom Picture Data and settings is not compatible with data from others Canon models
USB Terminal
mini-B, Hi-Speed USB
Video Terminal
3.5 mm 4-pole mini jack out only
Audio Terminal
2 – Balanced 3-pin XLR (Mic Level, Mic Level with phantom power and Line Level) in Handle unit
HDMI Terminal
Yes (Type A) Time code can be superimposed
AV Mini-terminal/Headphone Terminal
3.5mm stereo mini-jack
WFT Terminal
N/A
Operating Temperature Range
Performance requirements: 0°C to 40°C, 85% (relative humidity)
Operating requirements: 0°C to 45°C, 60% (relative humidity)
Dimensions (W x H x D)
C100 (Body plus Thumb Rest):
Approx. 5.3 x 6.7 x 5.1 in (135 x 170 x 129 mm)
C100 (Body plus Grip):
Approx. 7.2 x 6.7 x 5.1 in (182 x 170 x 129 mm)
C100 (Body plus Thumb Rest plus handle):
Approx. 5.6 x 11.1 x 9.3 in (142 x 281 x 236 mm)
C100 (Body plus Grip plus handle):
Approx. 7.2 x 11.1 x 9.3 in (182 x 281 x 236 mm)
Weight (not including lens)
Main Unit:
C100 Body: Approx. TBA lb. / TBA g
Grip: Approx. 8.1 oz. / 230 g
Handle Unit: Approx. TBA oz. / TBA g
BP-955 Battery: 7.8 oz / 220g
SD Cards x 2: 0.14 oz / 4g




Connect
Social Media