Install Final Cut Studio 3 On A SSD, And Save 50GB Of Space
Maybe this post is a little late but I still use the EOL’ed Final Cut Pro 7. I have tried Premier Pro CS5.5 and its pretty good, but for now I still use FCP7 most of the time. If your like me and still want to use FCP Suite 3 here is a great way to save space on your boot drive with a super fast SSD.
I recently upgraded my editing Mac Pro with a OWC 120GB SDD drive to get more performance out of it. This was a good time to do the upgrade since I decided to also go with OSX Lion. I feel OSX Lion is ready for prime time now. I’m not an early adopter of new operating systems, I like to wait a few months and let all the early adopters test it first. OSX Lion seems to be the easiest upgrade I can remember and works with Final Cut Studio 3 fine. Final Cut Studio is a BIG program. The content alone is around 50GB. Thats huge! by installing the content for each program on a different drive you can really save a ton of space on your SSD. Here is a easy way to achieve this.
The first thing you need to do is install Final Cut Studio with the install disk.
Quick Tip – I made disk images of all seven install disk and a text doc with the serial number. Put them all in one folder on a external drive for installing. This is much faster than feeding the disks and keeps the original disks safe.
When its time to do the install open each set. Dont open all the disk images yet, only the Final Cut Studio Install disk. After agreeing with the license you get to Installation Type. This is key. Only select the programs.
- Check Final Cut Pro
- Color
- Compressor
- Apple Qmaster
- Cinema Tools
Next one is Motion.
Click the triangle on the left of the box and uncheck the Motion Content and Motion LiveFonts. Make sure Motion the program is checked so it will install the program.
Do the same for Soundtrack Pro and DVD Studio Pro. Again uncheck all the content options and ONLY the programs should be checked.
The install will go pretty fast since you are not installing about 50GB of media files.
Once the programs have been installed we now want to install all the media for those programs on another drive. I have three internal drives installed in my Mac Pro so I used one of them. Create a new folder and name it Final Cut Studio Content or what ever you like.
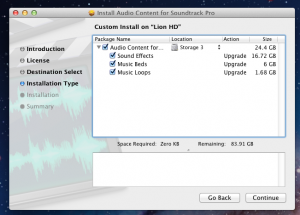
Now insert the Audio Content 1 disk. Agree with license and get to Installation Type window. Here is where you will pick the folder on the other drive. Not the main boot disk. Under location the default is Apple. On the right of the folder you see two triangles. Click on it and choose the location. Then continue. Do the same for the rest of the media disks.
- Audio Content 1
- Audio Content 2
- Audio Content 3
- DVD Studio Pro Content
- Motion Content 1
- Motion Content 2
Thats it! You now have a nice and tidy install and plenty of room for a few more programs.
On my 120GB SSD I installed Final Cut Studio 3 and Adobe Production Premium CS5.5. These heavy hitters including Lion took up 35.28GB. Not bad at all.
Happy Editing!
Please help support my blog by using this link for Amazon.com. It cost you nothing extra but helps support my blog. Thanks!
Filed in: Post Production • Video Editing


Thank you for taking the time and giving this neat and easily understandable description of how to install Final Cut Studio and its contents on seperate disks! This helps a lot not making mistakes on the rush or lightheadedly. I did what you proposed about making dmgs from the original install disks when I first installed it, but put it all on the boot drive since the boot drive was massive (2TB). But since I am planning to do a fresh install on a solid state drive, the question of disk space started to occur to me as being essential. This way I landed here.
Thank again for your effort!