Upgrading The Processors On My Early 2009 Mac Pro At A Bargain Price
I’ve been looking at buying either a iMac 4K or the new Mac Pro but both are so expensive I just kept putting it off. I have two Macs right now. An aging early 2009 Mac Pro with two Quad-Core 2.26 Ghz processors model ID MacPro4,1 and a MacBook Pro Retina. Great laptop. Both get the job done but I don’t like editing on the laptop all that much. I ended up making the MacBook Pro Retina my main computer. It’s okay but not ideal. I like a workstation so I started looking at what I could do to upgrade it. Usually upgrades on macs are RAM, PCI cards and graphic cards. Thats pretty much it but then I came across a few interesting videos and articles on upgrading the processors. What? How the heck is that possible. Well it is and the way I did it was so easy I highly recommend it.
I found a couple of options. One was to send the tray with the processors and ram on them to a vender and they would perform the upgrade. This would run around $950 to $1444.95 plus shipping.
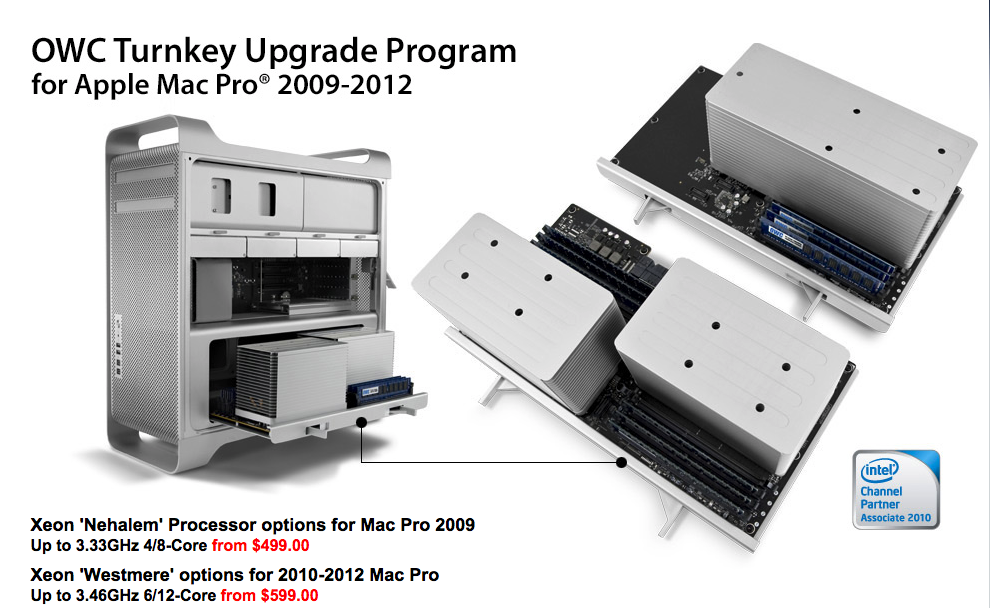
OWC has a Turnkey solution but they don’t offer the speed bump that I was looking for. I want the BIG jump. Two 6-Core 3.46GHZ Xeon X5690.
If I was going the mail the tray in route to get the12-Core 3.46GHZ Xeon X5690 it would cost $1444.95.
Thats a lot of money and not sure if it’s worth it and the other way is way more complicated. Using the CPU’s with the cap on requires much more complicated modifications Google it and you will read the stories. More on that later.
If you’ve ever built or worked on a computer before that helps and this way is much easier and safer. If you haven’t I would recommend asking some friends that have had experience and let them help, but it really is simple.
I found you can buy the processors, but you have to do some extra stuff to make it fit. The stock ones have a cover on them that makes them taller and that causes issues. If you over tighten you could damage the chip and the board basically destroying the computer and making it really expensive to fix. Here is what I did.
DN Computers sells a kit for my 2009 MacPro 4,1. I went for the fastest processors I could get. The 12-Core 3.46GHZ Xeon X5690 SLBVX. The kit was $549.99. From what I’ve read my MacPro 4,1 model happens to be a very good candidate for this upgrade. If you have this model you are in luck too!
DN Computers is offering readers of my blog a $10 discount. Use code ERIKNASO at checkout. I asked them what other options are available.
I have 2 basic CPUs that I’d recommend. The 3.46GHZ or the 3.06GHZ. The only reason I might suggest the 3.06 is if you’re worried about the extra heat from the 3.46 (possibly if you have a really high end graphics card or run the computer in a warm/hot area), it also saves a little bit.
I do continually restock, and would be glad to do other CPUs if requested. I only stock these two at this time:
Thanks again.
DN Computers
The other way is way more complicated. Google it and you will read the stories. If you ever built a computer before this way is super easy. If you haven’t I would recommend asking some friends that have had experience and let them help but it really is simple.
DN Computers doesn’t have the all the CPU options in stock. You will need to check with them to see what’s available.
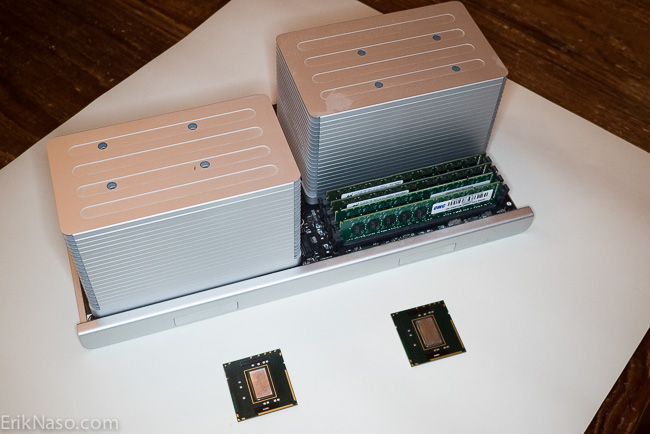
Why buy the kit? Because they prep the CPU for you by removing the IHS cap on the processor so it doesn’t require any modifications during install. It’s a direct CPU swap. I don’t know how they get the cap off. It’s not something you can do yourself.
Here is the same CPU with the Intel cap on the processor.
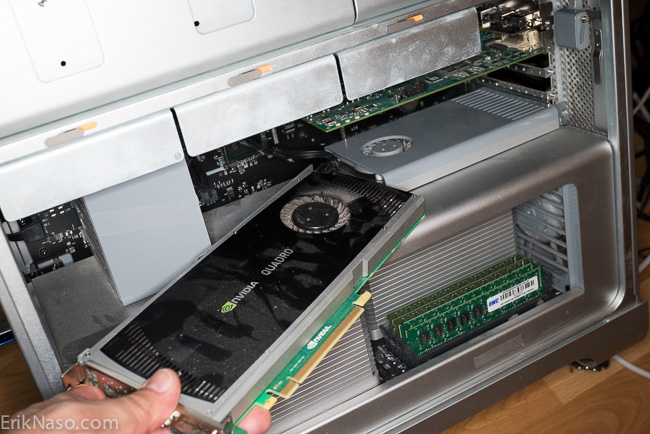
Un order to perform the firmware update I had to put a stock Apple video card in because with the Quadro 4000 installed the firmware update wouldn’t take. Not sure why. if you don’t have your original video card you can find them on eBay. I believe any stock card that shipped with your Mac model would work. After the update is done the Quadro 4000 gets reinstalled.
First step. Flashing the firmware to version MacPro 5,1. This is a must in order to get the Mac Pro to work with these new processors.
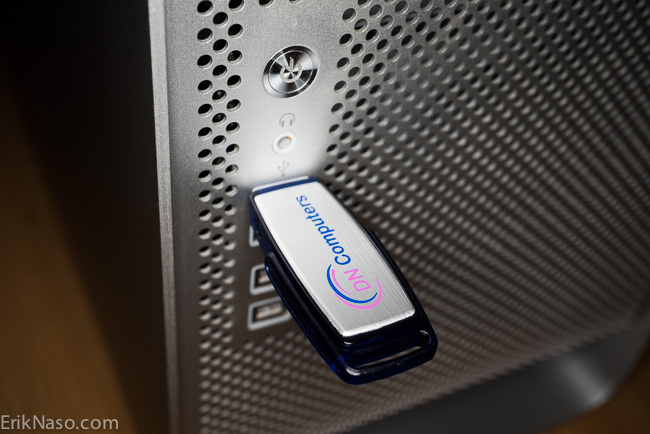
The process is simple. The kit includes a USB drive with the firmware on it. Just run it from the USB drive and follow the on screen instructions.
Unplug the computer and remove the tray that has the two CPUs and RAM installed on it. Super easy to take out.
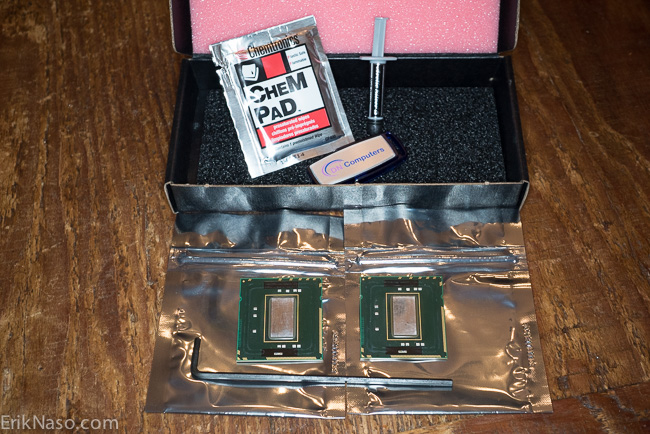
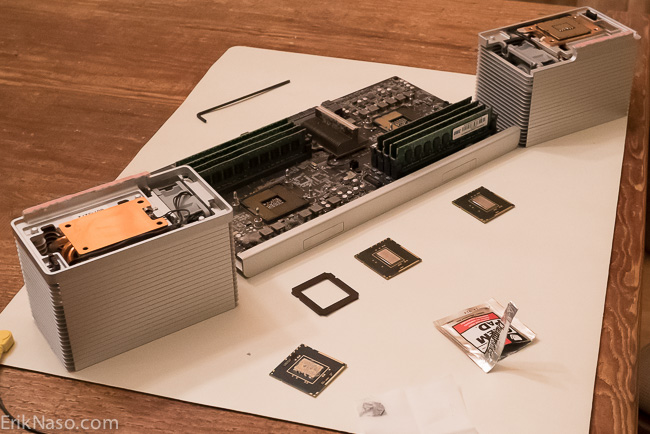
Use the supplied hex driver to remove the heatsinks. I didn’t take my RAM out. Yes I probably should have but I’m careful. I did use a antistatic matt 😀
When I lifted the The CPU it was stuck to the bottom of the heatsink. DO NOT try to install the new one that way.
I wiggled it off carefully and put it aside.
On the top of the CPU is a frame. This is a little riser I think. Put it aside and take note how it goes on. The frame has two notches so it’s easy to reinstall when the time comes. Then did the same to the second CPU.
I then cleaned off the old thermal paste with the supplied pad on both the old CPU’s and heatsinks. Repeat on the second CPU.
Now we are ready to put it back together!
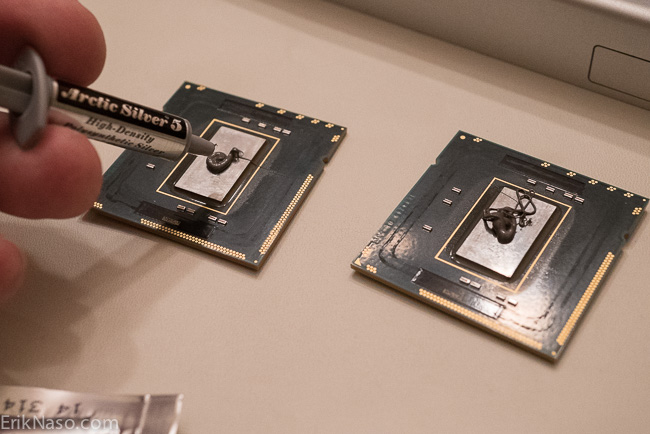
I then put a little thermal paste on each CPU and it’s ready to go.
The new CPU fits perfect. Just line up the notches and it plops right in. Put the frame back and it’s ready for the heatsink now.
This part was where you don’t want to screw up. but with these CPU’s I didn’t have to worry about over tightening and damaging the board or the CPU. The only thing I have to worry about is lining up the plug on the heatsink. Once it’s lined up it all slides together super smooth.
Tighten up the four hex screws on each and done. By the way the screws don’t come out of the heatsink. They are spring loaded so it takes a little wiggling to set them.
With the tray ready to go I just put it back in and plugged the power cord in and powered up the Mac Pro.
It worked!
The new system was up and running.
The new processors show up in “About This Mac” as an Early 2009 but in the “System Report” it shows it now as MacPro5,1 instead of MacPro4,1.
After running a few bench scores with Maxon Cinebench R15 I easily doubled the speed and added a few more frames per second too. Not bad for $550.
This was so simple and the results are well worth it. I just doubled the speed of my old Mac Pro giving me at least another year of editing with Premiere Pro CC on this 2009 Mac Pro. Now that I have the new firmware I could also upgrade the RAM to DDR3 ECC 1333MHz but I dont think I will. At least for now……
Follow me on Twitter @eriknaso and check out my page on Facebook.
Thanks for coming by! Please help support my site by using the links on this page or bookmark these from my favorite retailers, B&H, Adorama, Zacuto, Amazon.com & Think Tank Photo Using the links cost you nothing extra, but it helps offset the cost of running my blog. Thanks again for coming by eriknaso.com!
Interested in buying a new camera? Well I have a course on Lynda.com you should watch that will help you pick the right one for the job.
Filed in: Featured Post • Post Production • Production
Comments (37)
Trackback URL | Comments RSS Feed
Sites That Link to this Post
- Upgrade MacPro Early 2009 | Studio Kurashi | May 27, 2016
- Need or want? The iMac Pro dilemma - Newsshooter | January 4, 2018











Wow, that’s incredible! I think that will be a Summer project for me. How long did the whole procedure take?
About an hour. But then I was taking pictures and documenting the whole thing too.
I’m in the exact same boat, so thanks for sharing! (Now to work up the courage…)
This makes me WANT an old mac pro! Great writeup!
That’s a great result! Thanks for the information. My Mac Pro is a 5,1 and I’ll have to look out for processor upgrades like this DIY.
I am impressed I’ll look into my old MacPro and see what model # i have ,great to read your article
Thanks for the post! Very interesting. The DN computers website has loren ipsum fake text for their shipping and customer service page. It worries me about the legitimacy of the website.
Sounds like your experience was positive however, I might consider doing this, I’m scared id screw my computer up at the same time!
Thanks for posting this. I have the same 2009 Mac and have been thinking about this upgrade for a couple of years now. The processors were just too expensive. The price now is just too good not to try it, so I am taking the leap. One question, does the machine run extra hot? Did you have to do anything to change your fan speed?
Seems to run fine with no heat issues. Fans are really calm even when rendering. I also have a NVIDEA 980 installed and 3 WD Black drives inside as a RAID0.If you live in a hot environment it might be better to get the next model down. It really made a big difference. Make sure to use the code ERIKNASO to save a little cash!
Erik
I did the upgrade and all seemed to go as you described. However once I rebooted, some of my memory modules were not showing up. Do I need to zap the PRAM or reset SMC? Just wondering if that would fix the problem or if something else strange happened in the process.
Updating my own post: I didn’t tighten the screws down all the way which caused the memory to not register properly. Now it is working perfectly.
Great! I’m loving the power I know have. Enjoy!
I just ordered mine, Erik! I’m doing a complete overhaul on my main edit suite MacPro Tower machine. Definitely didn’t want to go the Trashcan™ route. Really looking forward to this upgrade. Cheers for such an awesome article!!!
Thanks Marco! It’s a great upgrade and a pretty good value.
Hi Erik, thanks for the guide…
Have you tried this with the single processor?
Do you know if I can go with the X5690 for the Quad 2009?
Regards
Claus
I havent since I have the dual processor model.
Because I was purchasing a machine specifically to be upgraded, I had the liberty of waiting for a 2010 model to show up at an acceptable price. This made the installation simpler and provided a bit more protection against incompatible OS changes. (Flashing the PROM gets a bit too close to Hackintosh territory for my taste. 🙂 In any case, the upgrade went very smoothly.
-r
Have you tried adding USB 3.0 ports to the machine? I am entertaining doing this upgrade to my 4,1 MP but the lack of USB 3.0 ports and thunderbolt make it feel like I didn’t quite get to where I want to go. I don’t expect to solve the thunderbolt problem but the USB 3.0 problem is one I would need to solve.
Thanks for sharing this information.
Yes I did. It’s great and I have a esata card too.
I got the Caldigit 603 pro card with usb3 and esata. It’s coming Monday and should be great!
Btw I have created a Facebook group for upgrading the MP
http://Www.facebook.com/macproupgrade 🙂 come join!
Sorry, wrong address. It’s https://www.facebook.com/groups/Mac.Pro.Upgrade
Q: I have two older MP’s:
1st it 2007 (i believe):
Hardware Overview:
Model Name: Mac Pro
Model Identifier: MacPro2,1
Processor Name: Quad-Core Intel Xeon
Processor Speed: 3 GHz
Number of Processors: 2
Total Number of Cores: 8
L2 Cache (per Processor): 8 MB
Memory: 16 GB
Bus Speed: 1.33 GHz
Boot ROM Version: MP21.007F.B08
SMC Version (system): 1.15f3
Serial Number (system): 4074703E0GP
Hardware UUID: 00000000-0000-1000-8000-001D4F455664
Second is Early 2009 model:
Hardware Overview:
Model Name: Mac Pro
Model Identifier: MacPro3,1
Processor Name: Quad-Core Intel Xeon
Processor Speed: 2.8 GHz
Number of Processors: 2
Total Number of Cores: 8
L2 Cache (per Processor): 12 MB
Memory: 14 GB
Bus Speed: 1.6 GHz
Boot ROM Version: MP31.006C.B05
SMC Version (system): 1.25f4
Serial Number (system): G8804335XYL
Hardware UUID: 9CDEC786-128B-5A54-90AB-8D60CC396797
Would these kick-ass upgrades work on either older MacPro?
Most Appreciated,
Rafe
Hi.
Great article!
Did you really get the 2 x 3.46 kit for $549.99?
Now it’s closer to $900
Yes and WOW!
can the same be done for the 2008 model?
I’m not sure
No, its not possible
I’m debating splurging on a maxed out iMac 27″ 5k (About $2,500, after a $500 Craigslist sale of my Mac Pro and old LED monitor) or upgrading my Mac Pro 4,1 the way you have ($500 for processor, plus 4GB video card).
Obviously saving money is good, but I don’t want to throw good money after bad.
Any advice or regrets?
The upgrades got me through a very tough edit so no regrets. The only issue I’m having is the new wifi card I installed doesnt seem to work as well as Id hoped and IO is an issue since the the best I can get is USB 3 and Esata. Would like Thunderbolt.
Thanks, Eric. Stumbling on this blog led to a lot of research on my Mac Pro’s true potential with a few upgrades. I’m torn on whether to upgrade the 1009 Mac Pro or sell it and get a pimped out iMac.
So far, advantages of the iMac:
+ Neat, all-in-on solution
+ Incredible monitor
Disadvantages:
– minimal upgradability
– looking at $3k
– You can’t use the monitor on another computer
Mac Pro upgrade
+ About half the price
+ Parts like video card, blade SSD, hard drives can all be moved over to a new system some day if the need arose.
+ If I buy a Dell 4K monitor for the Mac Pro, I can use it with a laptop
+ Infinitely changeable, upgradeable, expandable — well, except for that Thunderbolt part
– Doesn’t have the sexy 5K monitor
– Clunky big case, though inside it’s a work of art
– It becomes a bit of an unsupported Frankenmac
I think it comes down to money, the form factor, and the monitor. I’ll decide in a couple of days for sure.
Advantages
I have tried to upgrade mu 4.1 mac in a simmilar way. Flashed my board to 5,1 but apon instaling procesors 2x 6cores westemere, comp wont go, just have two red light shining next to procesores. When i put back my old procesors everything works fine.
AFAIK Dragi, that means that you haven’t tightened the processors down correctly. I believe the flashing red light means that they aren’t tightened down enough… I saw a youtube video where after the upgrade, he got the flashing red light on the MoBo (Logic Board, whatever) and the fans went way too fast. So he turned everything off, tightened the screws down (to _just_ finger-tight) a bit more, and then everything was as it should be, he showed the new specs and temperature and that took care of it.
I think we’re all tentative about not wanting to go too far in being cautious so we don’t break our beautiful MPs and new CPU trays.
Check out youtube and see if you can find and watch the video. You might have to clean the thermal paste again since it’s been a while since you tried it.
Great article! Can you do this with a single processor 4,1?
This is my question, too. Is it safe/ok to upgrade a MP 4,1 single-CUP to a Dual one?
I am looking to get the 2009 Mac Pro. With the 4 core processor and was wondering after the firmware upgrade. Can I upgrade to a 12 core or do I have to have the 6 core Mac Pro!